Many first-time fence installers wonder what size nails for fence pickets they should use. Selecting the right size can spare you from frequent repairs and poor fence performance. Nails that are too short may loosen over time, while nails that are too long might split the boards. In any home improvement project, picking the proper fasteners helps ensure a sturdy and lasting result.
Contents
- 1 Why Nail Size Matters
- 2 Best Size Nails for Fence Pickets
- 3 Type of Nails for Fence Pickets
- 4 Nail Length for Fence Pickets
- 5 Tips on Proper Nail Spacing
- 6 Nail vs. Screw: When to Choose Screws
- 7 Checking Fastener Costs
- 8 Handling Fence Repairs
- 9 Maintenance Routine
- 10 Guide to Nail Types for Fencing
- 11 Final Thoughts on Getting It Right
Why Nail Size Matters
The dimensions of your fence pickets influence the nail you need. Thicker boards require a slightly longer nail to hold them firmly. If your nails don’t reach deep enough into the rails, the pickets can wobble or pop out. Choosing nail size for fence pickets also depends on the type of wood and the level of moisture in your region. You want a balance between grip and minimal board damage.
Factors Affecting Nail Grip
Nail shank design plays a key role in how securely the picket remains attached. A ring-shank or spiral-shank nail bites into the wood more effectively than a smooth-shank nail. The wood’s natural expansion and contraction can loosen nails over time, so you need a design that resists pull-out. By matching the nail grip to your fence board thickness, you help maintain consistent alignment.
Best Size Nails for Fence Pickets
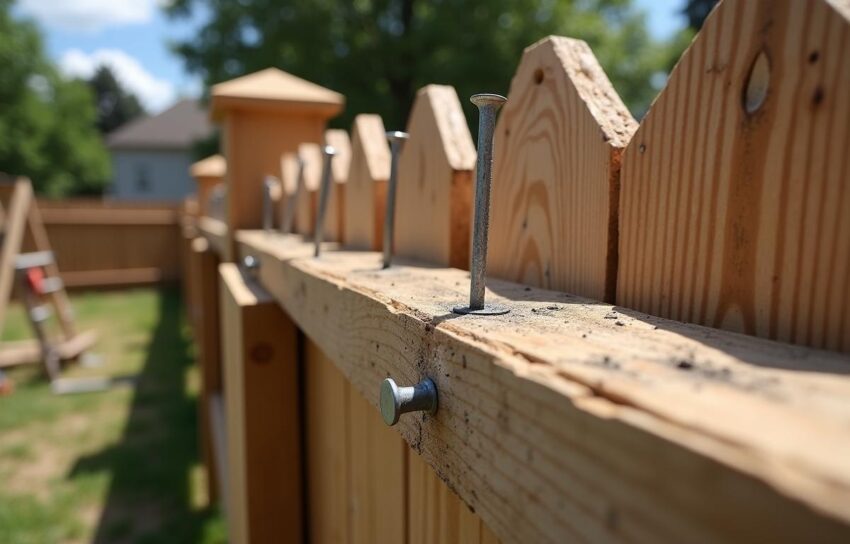
Many fence builders recommend nails around 2 to 2.5 inches long for most standard 3/4-inch pickets. This length gives enough penetration into the horizontal fence rails without poking through the other side. Some pickets are thicker, so you might need to go up to 2.75 inches for added security. If your pickets are on the thinner side, pick a slightly shorter nail to avoid splitting the board.
Balancing Nail Diameter
Diameter, often referred to as “gauge,” affects how much wood the nail displaces. Thicker nails can offer better holding power but also increase the chance of cracking a thin board. You generally don’t need a super-thick nail for fence pickets. Something in the 11- to 13-gauge range often strikes a good balance between strength and reduced splitting.
Type of Nails for Fence Pickets
Different nail types feature coatings or materials designed to combat rust or improve holding power. Galvanized nails are a popular choice because they resist rust in outdoor conditions. Aluminum nails are lightweight, but they can bend more easily. Stainless steel nails are the best nails for wooden fence construction if you want premium rust protection, though they cost more than galvanized options.
Common Coatings and Materials
The coating on your nails helps protect them from moisture damage. Hot-dipped galvanized nails have a thicker layer of zinc, making them more corrosion-resistant than electro-galvanized nails. This detail matters in wet climates or areas with extreme temperature shifts. Some nails have polymer coatings that enhance grip and reduce friction during installation. This helps the nail slide in smoothly while offering excellent staying power once set.
Nail Length for Fence Pickets
Shorter nails can make installation simpler, but you risk having boards pop loose. Longer nails ensure a firm grip but can cause wood splitting if they’re far beyond the thickness of the picket and rail combined. The optimal nail length for fence stability usually falls between 1.75 inches and 2.75 inches, depending on the overall fence design. Aim for at least 3/4 inch of nail penetration into the rail to guarantee solid anchoring.
Common Fence Board Thickness
Most standard fence boards you find at home improvement stores range from 5/8 inch to 1 inch thick. Make sure you measure the board thickness before getting your nails. If you’re using heavier, thicker pickets for custom fences, you might need to adjust. Proper nail spacing for fence pickets also helps prevent splits, so always take your time while nailing.
Tips on Proper Nail Spacing
Maintaining even spacing between nails on each picket can extend the fence’s life. Crowding nails together can cause splitting, while placing them too far apart might lead to a loose board edge. A good rule is to drive two nails per rail in a staggered formation. This technique spreads the stress points and keeps pickets from twisting. Make sure each nail goes in at a slight angle for extra hold.
Avoiding Split Boards
Splitting usually happens when nails are near the edge of a board or driven at the wrong angle. Drive nails a couple of inches from the top and bottom edges of each board. This placement helps reduce stress and keeps the picket intact. If your wood has knots, avoid putting a nail directly into these areas, as they’re prone to cracking. Keeping a consistent driving force is also crucial.
In many cases, you may wonder whether nails are the best approach or if screws serve you better. Screws give strong holding power and make repairs easier, but some fence installers find nails faster to install. A clear plan that accounts for your tools, time, and budget will guide you to the right choice.
Midway through your build, you might gather some wood fence lifespan advice by speaking to your local hardware store experts. They often know which types of nails or screws hold up best in your specific climate. Using the correct fasteners and coatings can mean fewer repairs over the years. A well-built fence stands up to moisture, wind, and regular wear, extending the time between maintenance tasks.
Some homeowners decide to boost property value with vinyl instead of a wooden fence. Vinyl requires less upkeep, and it resists rot and insects. However, it doesn’t offer the same natural look or customization that wood provides. Weighing your options helps you pick the right fence style for your tastes and neighborhood standards.
If you notice boards starting to tilt, you might consult a fix leaning fence guide to straighten them out. Sometimes the problem is improper fastening, or it could be that fence posts have rotted. Replacing weak posts, re-securing your pickets, and using well-sized nails often resolve minor leaning issues. Taking swift action keeps the problem from spreading along the fence line.
Nail vs. Screw: When to Choose Screws
Some homeowners consider screws a safer choice for custom fences because they rarely loosen over time. They give you the option to remove a board without damaging it, which is handy for repairs. If you need something that can withstand wind gusts and shifting soil, screws might be an excellent pick. However, installation speed is slower, so many professionals use nails for large fencing projects.
Checking Fastener Costs
Nails tend to cost less upfront, especially when buying them in bulk. You still need to consider materials that resist corrosion, so the price goes up if you opt for stainless steel. Screws, by comparison, are often pricier, and you might need specialized bits or a more powerful driver. Weigh these factors against the fence’s size and expected lifespan. A slightly higher nail price for rust-resistant coatings might save you from long-term hassles.
Handling Fence Repairs
Small repairs come up for any wood fence, whether it’s a brand-new install or a fence that has been in place for a decade. Loose pickets often stem from nails that aren’t long enough, so double-check the nail length for fence pickets you originally chose. Warping or twisting boards might need tightening or replacing. Pay attention to any boards that have become soft or discolored, as moisture could be weakening the wood and its fasteners.
Dealing with Warped Areas
Use a pry bar to remove damaged boards carefully. Inspect the underlying rail to ensure it’s still in good shape. If you see rot, that rail may need a partial or full replacement. After swapping out any old hardware, use nails that are appropriately sized to ensure a snug fit. Consider using a slightly longer nail if the rail seems compromised, but be mindful not to split the wood.
Maintenance Routine
A simple routine keeps nails in place longer and preserves your fence’s appearance. Periodically inspect each section, especially after storms. Tap in any nails that seem raised and replace ones that are rusted or bent. Re-stain or re-seal your fence every few years, paying attention to areas where moisture might pool. This way, you protect both the wood and the nails from premature failure.
Guide to Nail Types for Fencing
Some nails have textured shafts, while others rely on coatings to stay put. Ring-shank nails have ridges around the shaft that offer a powerful grip. Spiral-shank nails twist into the wood for increased resistance. If you’re looking for absolute longevity, you can’t go wrong with stainless steel. It does come at a cost, but the fence will likely outlast cheaper alternatives.
Final Thoughts on Getting It Right
Making the best size nails for fence pickets the focal point of your project prevents headaches down the road. When you pick nails that match your board thickness and local weather demands, you reduce the chance of future repairs. The right fasteners can also keep your fence looking straight and secure for a long time. Optimal nail length for fence stability hovers in that sweet spot where there’s enough hold without damaging the wood. By paying attention to these details, you’ll end up with a fence that boosts curb appeal and stands the test of time.