Discover how to install chain link fence without concrete efficiently and easily for your next project. Many people worry about the hassle of mixing or hauling concrete, yet they still want a sturdy fence. When you choose the right materials and follow proven steps, you can create a long-lasting barrier for your yard or property. The process involves a bit of planning and a willingness to pay close attention to details.
Contents
- 1 Why Choose a Concrete-Free Installation
- 2 Essential Tools and Materials
- 3 Chain Link Fence Installation Tips
- 4 Positioning the Fence Fabric and Rails
- 5 Handling Special Situations
- 6 Soil Considerations and Drainage
- 7 Alternative Methods and Safety Checks
- 8 Extra Reinforcements and Finishing Touches
- 9 Smart Tips to Keep in Mind
- 10 Maintaining a Sturdy Result
- 11 Checking for Long-Term Value
- 12 Closing Thoughts on a Successful Project
Why Choose a Concrete-Free Installation
Skipping concrete reduces the mess, heavy lifting, and overall time it takes to secure your fence posts. It also allows for easier adjustments if you need to re-align posts. This approach can be particularly appealing if you’re looking for cost-effective methods for installing fences without sacrificing durability. Be sure to consider your local climate, soil composition, and any regulations you must follow before taking on this type of project.
Another key benefit is the potential to reuse or reposition fence posts. When the poles aren’t cemented into the ground, you can relocate them if future landscaping changes occur. This method can be especially convenient in cases where exact property lines haven’t been finalized or you plan to expand or modify your fence later.
Essential Tools and Materials
As with any home improvement task, organizing the right gear makes a big difference. Gather tools needed for chain link fence installation, such as a post driver or sledgehammer, a shovel, measuring tape, fence fabric, fence posts, top rails, tension bars, tension bands, and sturdy work gloves. Make sure you have plenty of small hardware items like nuts, bolts, and fence ties to hold everything together. Keep a level handy, as well as a spool of string to ensure you maintain a straight fence line.
Pay attention to the type of soil you’ll be working with. Areas with rocky or clay-heavy soil can be trickier to dig into. Consider a heavier post driver if you suspect the ground might resist your attempts to set the posts in place. You might also invest in heavier-duty poles and top rails, especially when dealing with loose or sandy conditions.
Chain Link Fence Installation Tips
Installing chain link fence without concrete still demands proper technique. The posts need enough stability, which you can achieve by digging deep enough and compacting the soil around each post. Keep in mind that different climates influence the depth at which you should install posts. In regions where frost heave is a concern, you’ll want to go below the frost line to ensure stability.
Plan and Measure
Begin by marking your property lines and deciding how far apart each post should be. Most chain link panels accommodate a standard spacing, so consult your fence fabric’s width to determine the proper positioning. Use a measuring tape or wheel to mark points along the ground, then drive a small stake at each location to help guide the process.
Walk through your yard or planned fence line to see if there are any obstructions. If trees, rocky outcrops, or existing structures get in the way, adjust the placement or remove obstacles as needed. You want to avoid future complications, so take your time ensuring the layout is correct.
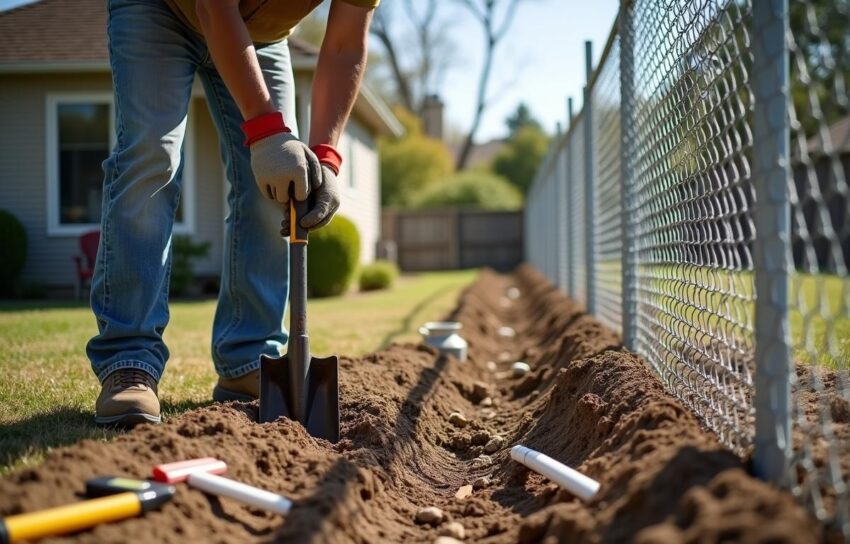
Prepare Post Holes
Once your lines are marked, begin digging holes for your posts. In this step-by-step fence installation process, depth matters significantly. A general rule is to bury a third of the post underground, although local norms or regulations might suggest a specific depth. Use a shovel or post hole digger to achieve a relatively uniform diameter for each hole.
After placing the post in the hole, backfill with a mixture of soil and gravel before compacting firmly. This technique improves stability while still being an alternative to concrete. It may take a bit longer to drive each post in place, but the payoff is a solid foundation that doesn’t require curing time.
Positioning the Fence Fabric and Rails
With your posts set, you’re ready to attach the top rails. Slide each rail through the loops on the posts and secure them using tension bands. Check the alignment with a level to keep everything straight. If you spot any leaning posts, adjust the soil around them and re-compact as needed.
Attaching the Chain Link Fabric
Unroll the chain link and line it up with the end posts. Thread tension bars through the fence fabric, then secure the bars to the posts using tension bands. Work your way along the fence line, attaching the fabric section by section. Keep an eye on the tension, as you don’t want the fence sagging or bunched in certain spots. If necessary, use fence ties to connect the fabric to the rails, spacing them evenly for a tight, polished look.
At around this stage, homeowners sometimes try setting posts without concrete, which can lead them to question if their fence will remain sturdy over time. By consistently tamping down the soil around each post and measuring carefully, you ensure a secure installation for the long haul.
Handling Special Situations
Sometimes you’ll need to make adjustments for gates or areas where the ground level changes dramatically. If you plan a double fence gate build, measure the width between the gate posts so each leaf has enough clearance to swing open. Make sure to install additional hardware like hinges, latches, and drop rods to maintain sturdy gate operation.
In areas where the fence line meets a slope, you may need to step the fence or angle the fabric to follow the ground. This might require more meticulous measurement and a few extra tension bars. The final result looks neat and keeps animals from slipping underneath.
Maintaining Your Fence Over Time
Any fence requires occasional inspection. Pay extra attention to how the posts hold up in soft soil or areas with frequent rainfall. At some point, you might need to repair a falling fence if a post begins to lean. Simply remove any loose dirt around that post, straighten it, and pack new soil or gravel around it again. Routine checks and minor fixes can extend the life of your chain link fence by years.
Soil Considerations and Drainage
Your local soil type directly impacts your fence’s long-term stability. Soil that drains well helps maintain firmness around each post. If you live in a region prone to standing water, try to grade the ground or install proper drainage solutions to prevent erosion. Waterlogged soil can weaken a fence, so staying on top of proper drainage often saves money and effort down the road.
When dealing with clay-heavy earth, pack the soil in several layers as you fill each hole. For sandy soil, mix in some gravel to create a firmer base. By focusing on the specific qualities of your soil, you’ll boost the reliability of the fence in challenging conditions.
Alternative Methods and Safety Checks
Many homeowners explore alternative methods for fence installation when they want to avoid a big concrete pour. Some prefer using steel spikes or post anchors that dig deep into the ground for extra support. Others experiment with alternative materials to concrete for fence posts, such as gravel or polymer backfill products. Whichever approach you choose, confirm local ordinances allow it.
For safety, always call your utility company before you dig. You need to ensure there are no wires or pipes that could be accidentally damaged. Doing so can help you avoid costly accidents or outages in your neighborhood. With the right research and caution, you’ll feel more confident as you tackle your fence.
Extra Reinforcements and Finishing Touches
A little effort in finishing touches goes a long way. Use fence ties or clips at regular intervals to secure the chain link fabric to the top rail. When done properly, the fence stands firm and doesn’t shift with time. Check corners and gates for any loose nuts or bolts, tightening them as necessary.
A fresh coat of weather-resistant paint or rust-proofing can enhance the appearance of the posts. You may also add privacy slats if you want extra coverage. This final flourish makes the fence look neat and cohesive with your home or landscape. Not every design needs them, but they’re worth considering if you live in a high-traffic area.
Smart Tips to Keep in Mind
Remember that a DIY chain link fence installation guide might list various ways to approach each step. Use those ideas as reference points, but trust your judgment on what fits your property best. If you find yourself struggling early on, don’t hesitate to ask an experienced neighbor or friend for input.
Pay attention to local building codes. Even a simple fence can trigger specific permit requirements, so it’s better to find out early than deal with fines. Proper research reduces the risk of having to relocate a post or even remove sections of fencing entirely. That’s time and money you can save by clarifying all regulations beforehand.
Maintaining a Sturdy Result
After wrapping up the main construction phase, keep an eye on your fence’s condition throughout the year. A quick inspection after every season helps you catch minor issues before they grow bigger. If you see signs of rust on the fabric or posts, address them quickly with rust-inhibiting products. Regular tightening of nuts and bolts ensures everything stays nicely aligned.
Moisture and extreme weather can loosen the ground near fence posts. If you notice any instability, simply re-compact or adjust the post as needed. This low-maintenance approach ensures your fence stands tall for years to come, providing a practical enclosure wherever you need it.
Checking for Long-Term Value
Installing chain link fence without concrete can offer peace of mind if done correctly. The primary advantage is flexibility—both in moving the fence line if needed and in reducing installation costs. You also sidestep potential concrete cracks that may occur over time due to freeze-thaw cycles. Focus on good soil compaction, precise measurements, and strong hardware to enjoy a stable fence for a very long time.
A fence that looks good while functioning effectively offers immediate benefits and potential boosts to property value. Buyers often appreciate neat fence lines and well-kept exterior spaces. If you’re aiming for an affordable, low-maintenance enclosure, this method checks all the right boxes.
Closing Thoughts on a Successful Project
Every yard has its own quirks, so rely on patience and observation as you work. Adapt your techniques based on factors like soil type, slope, and local regulations. Even small adjustments in post placement can make a huge difference. Stay consistent in your methodology, and your fence will stand strong under most everyday conditions.
Whether you’re dedicating a weekend or spreading the effort over several days, a concrete-free fence installation rewards you with convenience and adaptability. The next time you need to build or refresh a fence, keep these steps in mind and proceed with confidence.