Knowing how to install aluminum fence on concrete makes the whole process easier. And the good news is that a little planning and the right strategy can make the project rewarding.
Many homeowners choose aluminum fencing for its durability and modern look, and it pairs nicely with concrete patios or walkways. You simply need a few reliable methods, a set of quality tools, and a willingness to tackle the steps carefully. By preparing properly and taking your time, you’ll create a clean, professional fence line that lasts.
Contents
- 1 Essential Preparations for Aluminum Fence on Concrete
- 2 Post Positions: Aluminum Fence Installation Tips for Concrete
- 3 Securing Posts and Attaching Fence Panels
- 4 Addressing Important Details
- 5 Strength and Stability Considerations
- 6 Considering Project Costs and Value
- 7 Adding Finishing Touches
- 8 Final Checks and Ongoing Care
Essential Preparations for Aluminum Fence on Concrete
Begin by gathering everything you need for the job, which usually includes safety glasses, a hammer drill, masonry bits, a chalk line, a measuring tape, and the fence components themselves. Pick up aluminum fence panels, posts, post brackets, anchors, and hardware that fit your layout.
Make sure you have a clear idea of where the fence will run. Visualizing the lines on your property helps you determine the correct fence height and the total materials required. That extra bit of effort saves you from making multiple hardware store visits later.
Installing aluminum fence on concrete slab requires careful measurement to ensure each post fits your desired layout. Check your property boundaries and pay attention to any slopes or corners, as they affect how the fence aligns.
For complex layouts, mapping out the perimeter on paper can help clarify your plan. Whether you’re dealing with a small courtyard or an expansive outdoor living space, tailor the design to your exact needs. A bit of foresight prevents awkward fits and keeps the fence looking straight and even.
Post Positions: Aluminum Fence Installation Tips for Concrete
Marking your post locations accurately allows the panels to line up perfectly. You can use a chalk line or string to outline the straight line your fence will follow. Set small marks where each post will stand, verifying that they’re evenly spaced according to the fence manufacturer’s guidelines.
Double-check each measurement because an off-center post can throw off the entire fence line. Maintaining consistent spacing also keeps your fence sturdy over time.
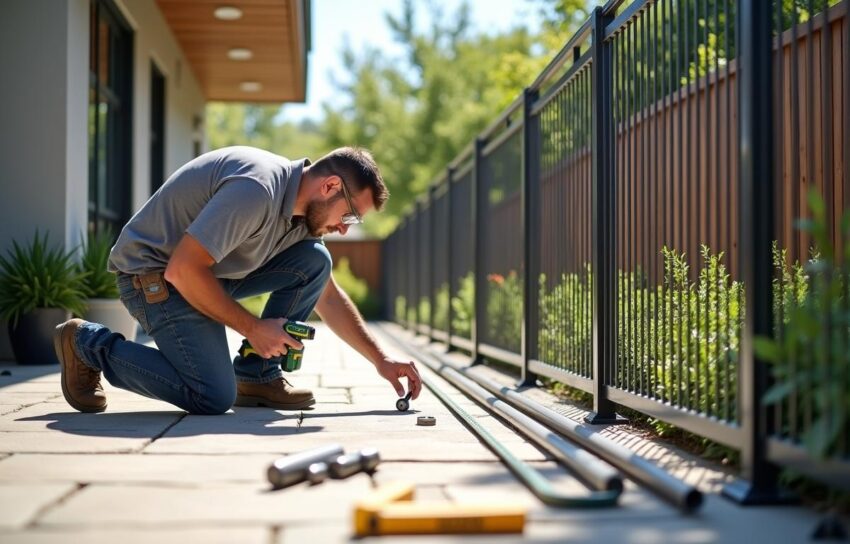
Drilling Through Concrete
Once your marks are set, drilling the holes becomes the next important step. Choose a hammer drill and the correct masonry bit size recommended for your post anchors. You want the holes to match the recommended diameter so the anchors fit snugly. While drilling, keep the tool steady and apply consistent pressure. You’ll reduce the chance of wobbling and avoid oversized holes, which can compromise stability.
Ensuring Secure Post Anchors
After drilling, clear any debris from the holes before installing your anchors. Small dust particles can prevent proper adhesion, so take extra time to vacuum or blow out the holes. Then, insert your anchors until they’re flush with the concrete surface.
This step forms a solid foundation for your fence posts once you tighten the bolts. By focusing on these aluminum fence installation tips for concrete, you establish a firm starting point for the entire project.
Securing Posts and Attaching Fence Panels
Carefully place each fence post over its corresponding anchor. Then, use your hardware to fasten the post to the concrete. Tighten the bolts securely, but don’t overdo it. You’ll want the post to stand firm without damaging the anchor. If anything feels loose, make adjustments before attaching the panels.
Measuring the height of each post prevents inconsistencies. A post’s height must align with the rest of the fence so the panels fit correctly. Some homeowners prefer to assemble fence sections on the ground, then mount them onto the posts. Others find it easier to attach one panel at a time. Choose the method that feels most comfortable, and don’t rush the process.
Securing Panels in Place
Once the posts stand upright, it’s time to connect the fence panels. Line them up with the pre-drilled holes in the posts, and fasten them according to the manufacturer’s instructions. Use the recommended hardware to ensure each panel remains secure for years to come. This step requires attention to detail. If a panel is slightly misaligned, adjust it before you fully tighten everything so the entire fence maintains a consistent look.
Take a moment to consider the type of gate you want for your entry point. Some people consider a double gate diy approach if they have a wide driveway or need extra room. This option makes accessing your property easier, especially if you frequently bring in large items. Ensure that your gate matches the fence in style and height so everything looks unified.
Addressing Important Details
Once you’ve attached a few fence panels, pause to check if everything aligns with your initial plan. If posts lean slightly, you can sometimes adjust them before adding more sections. Observing small details early helps you avoid big complications later. This approach also allows you to fine-tune your technique as you move from one panel to the next.
You might find references like a split rail fence guide online, which explains certain fence styles in detail. While a split rail fence differs greatly from an aluminum fence, it’s still helpful to understand the basics of fence assembly. Familiarizing yourself with various fence types can expand the range of ideas you bring to your project. It also prepares you if you ever combine different fencing styles on your property.
For some individuals, tackling this work alone is doable, but others appreciate having another person assist. An extra set of hands keeps the posts level and ensures faster progress. If you’re attached to the idea of a DIY aluminum fence installation guide, be sure to follow safety guidelines from reputable sources. Combining reliable resources with your personal touch often yields impressive results.
Strength and Stability Considerations
When it comes to concrete fastening techniques for fences, the type of fastener you use can make a big difference in the fence’s longevity. Certain anchors perform better than others, especially in climates with heavy rain or freeze-thaw cycles.
Double-check local building codes to avoid any issues. In some areas, special anchor types are required to handle weather challenges. Verify these details beforehand and choose the best solution for your site.
If you’re unsure about any step, you might consult professional aluminum fence installers. These experts have direct experience with different property layouts, anchor systems, and fence styles. Their insight can help you decide which approach fits your budget and timeline. Plus, they can highlight design considerations you may have overlooked. Sometimes, a single consultation is enough to provide extra confidence.
Considering Project Costs and Value
Stick to your established budget by estimating the cost to install aluminum fence on concrete early. You’ll need to price out fence panels, posts, anchors, and any specialty items. Look at the overall cost of aluminum fence installation if you prefer hiring a professional crew.
Professional rates vary based on labor costs in your region, complexity of the design, and your chosen fence style. Regardless of whether you DIY or hire out, a sturdy aluminum fence can add real value to your property in both function and aesthetics.
Some homeowners like to compare this with other fence styles, including wood or vinyl. Although aluminum often proves more expensive than wood upfront, it generally requires less ongoing maintenance. You won’t have to stain or seal it periodically, which can justify the investment over time. Assess what matters most to you. Durability, curb appeal, and minimal upkeep become key benefits.
Adding Finishing Touches
Once all panels and gates are in place, check the fence line for any uneven spots. Then tighten your hardware thoroughly. Clean off any dust or debris to reveal the final appearance of your aluminum fence. You can also go along the concrete edges to seal any small gaps. This step gives your project a neat finish. For better long-term protection, inspect your fence periodically and keep an eye on hardware for signs of rust or loosening.
If you’re curious about expansions, you might think about adding more sections later. This is where some homeowners research “aluminum fence installation tools” that simplify post-installation additions. Having those tools on hand can give you the flexibility to adjust or expand your fence over time. It also makes small fixes more convenient if you ever need to replace a panel. By planning for these possibilities, you maintain full control of your outdoor space.
Addressing Common Challenges
It’s normal to run into minor hiccups along the way. Concrete slabs can sometimes be uneven, causing the posts to stand at a slight angle. In situations like these, you might need a leveling shim or a different anchor style. A careful approach helps you adjust before moving on to secure the post fully. Should you encounter more complicated problems, you can search for specialized advice or consult experienced local workers.
Another challenge can involve matching the fence height to existing structures. Some properties have retaining walls or raised planters that create irregular edges. Adapting to these areas usually requires trimming panels or repositioning posts. Examine each unique spot as you go along. Patience and creativity make a big difference in achieving a cohesive design.
Final Checks and Ongoing Care
After your aluminum fence stands firmly, you’ll want to confirm that all hardware is tight and secure. It’s also wise to test your gate, especially if you decided on a double gate solution for added convenience. Smoother operation indicates a successful installation, but if the gate drags or latches incorrectly, minor fine-tuning should fix it. Take a moment to admire how the new fence accents your home’s exterior. The polished look can elevate your yard’s aesthetic and help define property boundaries.
You might occasionally hose down the fence to remove dirt or other debris, especially if you live in a dusty or windy region. This simple step prevents grime from building up. Over time, check the condition of your anchors, hardware, and fence panels. Intervening early stops small problems from growing into larger ones. An aluminum fence generally remains low-maintenance, so you can enjoy its benefits with minimal effort.
Your steps can vary slightly based on your property’s shape and size, but the general principles remain the same. Whether you use more advanced tools or prefer a straightforward approach, maintaining a safe and accurate install helps ensure durability.
If circumstances change or you decide to add a driveway entry, consult a professional aluminum fence installers group or look into a DIY aluminum fence installation guide to see what’s new. The fencing world keeps evolving, and staying informed never hurts.
In the end, the key to a solid aluminum fence on concrete lies in consistent measurements, proper drilling, and secure assembly. By paying attention to details and adapting to your yard’s quirks, you’ll create a functional and attractive barrier. Although the work may take time, the end result certainly justifies the effort.